

This page contain affiliate links. Please refer to my Disclosures Page for more details.
STOP! Before you hit ‘Jump to Recipe’ check ‘Skip to the Good Bit‘ below. I may answer a query you have about this recipe.
This French Apple Tart recipe is an updated recipe dating back to 2015. Originally I made four little tartlets. Don’t get me wrong, they were pretty little things but I wanted to a) improve the photos and b) see if the crème patisserie could cope with being grilled (caramelised) as a large Apple Tart instead.
The good news is that yes it can withstand being grilled as a large tart so now you have the option to make either.

What are the best Apples to use for this French Apple Tart?
It may seem a silly question but no, it’s not at all. There is a fine line between lovely soft apple slices and mushy apple that you can’t work with!
As the only baking that takes place is the blind baking of the pastry case. You need to part cook the apples in boiled water. The final ‘cooking’ process is when you pop the Apple Tart under a pre-heated grill or, if you have one, use a chefs blow torch. I talk more about this in another paragraph.
The type of apple you will need is a firm fleshed apple. Preferably not a fluffy red apple, certainly not a Bramley (or cooking) apple. The latter will break down into a delicious apple puree that’s lovely, but no good for decorating this Tart.
I tend to use Pink Lady apples (kids have expensive tastes). Or a Gala or firm Golden Delicious. You could also use Granny Smiths but these are very firm and will keep firm in the finished dessert.


The key to decorating this tart, in the way I have pictured, is to gently soften the apple slices. This is why I go to lengths on explaining what is the best apple to use.
I peel and slice the apples thinly and pour a boiled kettle of water over them and leave to stand for 5 minutes. Then carefully pour the hot water away (I use a colander). You now have pliable bendy apple slices ready to decorate your French Apple Tart.
How to Bake Blind Successfully?
After making the pastry. I tend to roll out and line the tin immediately. This way the gluten free pastry is more malleable and less likely to crack. See below for my tips on dealing with cracks.
Once you’ve lined your tin with the pastry and pressed gently into the edges, take a fork and evenly prick the base. This process of pricking the pastry case prevents air bubbles from forming during the baking process and encourages an even bake.
Next I take either a piece of non-stick baking paper or a round cake tin liner and cover the raw pastry case.
TOP TIP: If using baking paper I simply screw the paper up into a tight ball and undo again to line the case. This way the paper fits more snuggly into the corners.
Next take your baking beads or dried beans and fill the covered pastry case. These will ensure the case cooks without rising.

What can be used for baking beans?
My personal experience is that baking beans or beads work better than dried beans, rice or lentils. Whilst the latter are probably cheaper in the short run, baking beads last forever.
Another bonus to baking beads is that they are ceramic and heat up to oven temperature. This means that they too contribute towards cooking the pastry case.
If you have an urgent desire to make this French Apple Tart but find that you don’t have any baking beans then the following can be used as an alternative;
- dried beans (butter, haricot, berlotti..)
- rice
- lentils
- maize (popcorn kernels)
With any of the alternatives to baking beans, you can’t go ahead and eat them after using them to bake blind. Instead, I’d allow them to cool completely, tip into an old clean jam jar, and save as future baking beans.
How can I repair cracks in my gluten free pastry?
If your gluten free pastry does crack, not to worry, muggle pastry has its off days and cracks too. Simple pinch off a piece of excess pastry dough, fill in the crack, then dip your finger in a glass of water and rub the area gently to smooth the edges. Magic, the crack has disappeared!
How do I decorate this French Apple Tart?
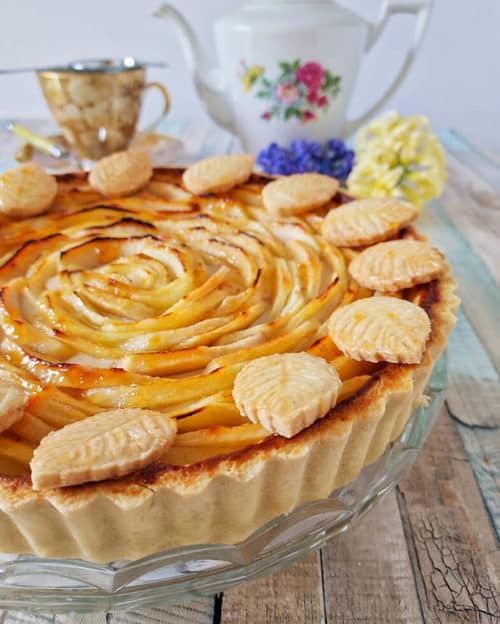
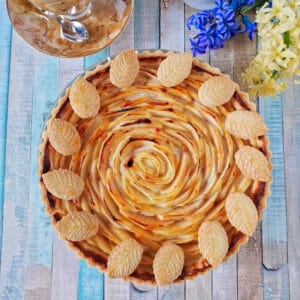
To decorate this tart in a beautiful flower design, begin by softening the apple slices as per instructions above. Now you have pliable apple slices that bend in a circular shape.
Start at the edge of the apple tart and begin to add each next slice halfway down the first. You need to create a spiral design that keeps getting smaller and smaller. As long as you sliced your apple slices thin enough, you should find the curved shape start to become more defined quite quickly.
TOP TIP: leave the thinnest, most pliable slices for the little rosette shape in the middle of the tart.


What can I use to glaze an Apple Tart?
The most effective glaze to use on this tart in my opinion is apricot jam. It has a lovely golden colour, isn’t an overpowering flavour and caramelises beautifully to enhance the golden colour.
Other glaze options are a sugar water solution – simply mix 2tsp of sugar with 1-2tbsp boiled water. The darker the sugar you chose, the better golden coloured finish you’ll get.
You could also use golden syrup or maple syrup but the latter has a strong flavour to it so may overpower the apple.
How do I create a golden top to my Apple Tart?
As I’ve alluded to above, the glaze has a key part to play in getting this French Apple Tart to caramelise beautifully. To create the caramelisation process you need heat and there are two methods I use at lot. Both are effective, both have their pros and cons.
Grilling the tart – this is the most effective in terms of an all over even golden colour but you have to preheat the grill. You’ll probably need to rotate the tart as grill tend to have hot spots and you must never take your eyes of the tart!
Blow torching the tart – this is way more fun, but can take a lot longer than grilling. It depends on the Chef’s blow torch that you have (I’ve added a link to the one I use*), but you need to hold the torch over the same place for a good while to get the ideal caramelisation effect. However, you are way more in control and can keep going over areas to get an even colour.
The tart you see pictured was cooked under a very hot grill and rotated 45 degrees once.


Subscribe today!
Sign up to my Newsletter & receive THREE FREE Downloads!
Including my Gluten, Dairy & Egg Free eBook
If you click the image below and make a purchase, I might get a few pennies for referring you…every little helps to run this website.

The History of Crème Pâtissèrie
The direct translation for Crème Pâtissière is Custard, think the former sounds much prettier!
My research into the history of Crème Patisserie or pastry cream or custard has found little argument that it was invented by François Massialot, a French chef born in Limoges in 1660.
François Massialot was the chef of many personalities such as Philippe I, Duke of Orleans (brother of Louis XIV), the Duke of Aumont and the Cardinal of Estrées.
The traditional foodie
It seems that the custard would be made without sugar initially so that it could be used for both sweet and savoury dishes. Some recipes call for the use of the whole egg (white and yolk) whilst others only require the yolk. The latter gives you a richer yellow coloured custard.
I’ve also found old recipes using rice starch or rice flour so you could argue that these were gluten free. Well, gluten free until they were poured into glutenous pastry cases that is.

How do you make a gluten free Crème Pâtissèrie?
The ingredients for crème patisserie are as follows;
Crème Pâtissèrie
- 1 egg
- 40 g caster sugar
- 30 g plain flour
- 200 ml milk
- 1 tsp vanilla extract
As you can see the only gluten containing ingredient is the plain flour so to make a gluten free crème patisserie I simply swap the plain flour for a gluten free flour. I have used both gluten free plain (all purpose) flour and cornflour (corn starch). Both work equally as well. For the tart I made on the day I photographed I used cornflour but it’s good to know you can use the alternative if you cannot tolerate cornflour.

Can you make this Apple Tart Dairy Free?
This French Apple Tart can be made dairy free if you make the pastry with a dairy free block of butter and swap the milk in the crème patisserie for your normal dairy free alternative.
Can you make this Tart Vegan?
I have not attempted to make this into a vegan crème patisserie apple tart – yet. I know it can be done, I just need to work out how to get it as close to the real thing first so watch this space.
While I think of it, make sure you’re signed up to my newsletter and that way you’ll hear about my new recipes every Friday (assuming I’ve got a new one that week) you also get discounts, top tips, gluten free news and more.
Subscribe today!
Sign up to my Newsletter & receive THREE FREE Downloads!
Including my Gluten, Dairy & Egg Free eBook
If you click the image below and make a purchase, I might get a few pennies for referring you…every little helps to run this website.
How long will this Tart keep?
This tart is best eaten on the day, however, I have made it and presented it the day after. Keeping it in the fridge overnight is fine. Even better if kept in a Tupperware container to prevent the tart absorbing fridge smells. I have also been to know to serve the last slice on day three with no issue.
Gluten Free Apple Recipe Inspiration


Gluten Free French Apple Tart Recipe
If you make it and like the recipe I would be eternally grateful if you popped back and commented leaving a star rating as this will tell search engines that this recipe is worth checking out and others will get to find it in searches.
Gluten Free French Apple Tart
Ingredients
- 250 g gluten free plain flour
- 125 g chilled cubed butter
- 60 g caster sugar
- 1 beaten egg
- 1 tbsp cold water
Crème Pâtissèrie
- 1 egg(s)
- 40 g caster sugar
- 30 g gluten free plain flour or cornflour
- 200 ml milk
- 1 tsp vanilla extract
Decoration
- 4 dessert apples peeled, cored and sliced thinly
- 50 g apricot jam
Instructions
To make the pastry
- To make the pastry, sift the flour into a bowl, add the chilled butter and rub into crumbs. You can use a rounded knife to do this if you've got warm hands or like me use a pastry blender
- Stir in the sugar so it looks like a crumble mix then add the egg and tablespoon of cold water.
- Now, using a rounded knife stir the egg into the crumb mixture until it begins to come together.
- Turn out onto a well floured surface and knead quickly into a ball.
- Roll out the pastry immediately leaving it 1-1.5cm thick and line a fluted loose bottom flan/tart tin. I use a 23cm tin.
- Gently press the pastry into the edges of the tin, any cracks appear then follow the tips in the recipe post or check out [notes] below
- Finally, prick the bottom of the case and pop into the fridge to chill whilst you crack on with your creme patiserrie. (chilling will reduce the chance of the case shrinking).
To make the Crème Pâtissière
- To make the crème pâtissèrie put the egg, sugar, vanilla and flour/cornflour into a bowl, take a little of the milk and mix the dry ingredients to a paste.
- Pour the remaining milk into a saucepan and bring to a gentle boil.
- Now pour the warmed milk onto the paste mixture whisking quickly to prevent lumps.
- Transfer all the liquid custard back into the saucepan and cook gently stirring until the custard thickens
- Pour back into the first bowl and press down a piece of cling film to prevent a skin forming. Allow to cool whilst you start blind baking the tart case.TOP TIP: I don't have clingfilm/wrap in my house, so I just add a saucepan lid over the bowl to help prevent a skin, if one does form, it's not the end of the world, just give it a good whisk.
To bake blind
- Cut a large piece of baking paper and scrunch it up into a ball! Unwrap the scrunched paper and gently place over the raw pastry case. Pour in your baking beans or rice if you have no beans.
- Bake in oven at 200°C | 180°C fan | 400°F | Gas 6 for 8 minutes, then remove the baking paper and beans and return to the oven for a further 12 minutes.
- Once baked, allow pastry tart to cool completely, meanwhile, prep your apple decorations.
To prep the apple
- Peel and thinly slice 4 eating apples, read above for my recommendations on what apples to use.
- Place the apples in a large bowl and pour over a recently boiled kettle to cover the apples. This is to soften then enough to work with.
- After just 5 mins drain the apples – I use a colander. Set aside
To build the apple tart
- Your pastry case will have cooled enough by now. Give the Crème Pâtissière aa quick whisk to break up any skin and pour into the pastry case. Smooth flat with a spatula.
- Take the apple slices and one-by-one add them to the tart gently pushing them into the custard. overlay each slice by half a slice and continue until you have covered the tart in a beautifulk apple spiral.
- Measure the apricot jam into a cup and heat for 10 seconds in the microwave to loosen it. Now you can easily brush the apple with a lovely glossy glaze.
To caramelise the tart
- Either pop under a very hot pre-heated grill and toast until golden or use a chefs blow torch to caramelise.
- The tart is ready to eat immediately or pop in the fridge to chill until ready to serve.
Notes
HOW CAN I REPAIR CRACKS IN MY GLUTEN FREE PASTRY?
If your gluten free pastry does crack, not to worry, muggle pastry has its off days and cracks too. Simple pinch off a piece of excess pastry dough, fill in the crack, then dip your finger in a glass of water and rub the area gently to smooth the edges. Magic, the crack has disappeared!Nutrition


Keep Glutarama AD-Free
I do not to have AD’s on my website. But it means I need to find other ways to pay for the £500+ it costs to run it every year.
If you want to support me you can here via Ko-fi and ‘buy me a coffee‘

Click to find out more about the Free From Food Awards
Click to see gluten free products available on Amazon
Subscribe to my email list so that you get NEW recipes straight in your mailbox plus THREE Free gifts and access to some amazing gluten free DISCOUNTS!
*disclaimer: I use affiliate codes on my website, the vast majority are to Amazon. If you click on any of the links or images in the post and make a purchase my family will benefit from a small % of that purchase at no extra cost to you.
For full transparency, in 2020 I made my first £25, and in 2022 I reached my next £25 (Amazon don’t transfer the money until you reach £25). Recently I got paid a whopping £27.10 for 2023.
So to date I have made £78.58 since I first started the scheme in 2017. It won’t pay the bills, that’s for sure but it does help to pay for ingredients or little treats to cheer me up!


Leave a Reply