This page contain affiliate links. Please refer to my Disclosures Page for more details.
STOP! Before you hit ‘Jump to Recipe’ check ‘Skip to the Good Bit‘ below. I may answer a query you have about this recipe.
My recipe for these Gluten Free Belgium Buns was an absolute must. Can you remember your first ever Belgium Buns? Can you remember your last?
I can remember my first, I must have been about 10 years old and mum used to take us three girls to swimming lessons and we could choose a cake from the cake counter in Tesco on the way. I always picked a Belgium Bun, my sister Nicola always chose a chocolate éclair and my littlest sister Joanne always picked a double chocolate muffin that looked bigger than her!
Bethany had never tried a Belgium Bun – until now that is.
UPDATE: I have recently tried this recipe again with a different flour blend, this is not for everyone as it has gluten free WHEAT starch in it. Not okay for those allergic to WHEAT and anyone still concerned about this ingredient even if it is certified gluten free.
I’m not here to judge if you will or won’t want to use it, but this flour has given me the best results to date.


Subscribe today!
Sign up to my Friday Newsletter & receive 3 Free Downloads!
- GF & DF e-Book
- Conversion Guide
- 3 Guides to Dietary Needs
Skip to the good bit
- How do you make vegan lemon curd?
- Not enough time to make lemon curd?
- Do you need to prove these Gluten Free Belgium Buns?
- Why are they called Belgium Buns?
- What’s the difference between Belgium Buns and Chelsea Buns?
- How to make the dough
- How to make the Belgium Bun shape
- My dough is way too soft!
- Will these Belgium Buns keep well?
- Other gluten free favourites you may like to try
- Gluten Free Belgium Buns Recipe

How do you make vegan lemon curd?
To make (in my opinion) the best Belgium Bun you need to have a citrus curd to spread on the dough before you roll into the familiar pinwheel shape. The lemon curd part can often be overlooked with homemade versions. I promised myself I wouldn’t begin to develop a gluten free recipe for Belgium Buns until I had developed a vegan lemon curd.
This recipe is therefore not only gluten free but also dairy free and egg free too. You can nip over to my vegan lemon curd recipe below or if you are not in need of a vegan curd then by all means use the standard lemon curd to use in this recipe.
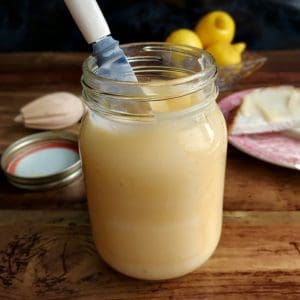

Not enough time to make lemon curd?
Well you can buy lemon curd of course but they are not egg free. If you need an egg free version then you can find vegan curds on the interweb for example this Janda do vegan lemon curd.
The alternative is this lemony cream cheese that I made recently with this latest photoshoot.
60g plant based cream cheese (I used Violife)
60g plant based condensed milk (I make my own but you can get vegan ones)
2tsps lemon juice
Do you need to prove these Gluten Free Belgium Buns?
Yes, you do need to prove the dough in my gluten free Belgium Buns recipe. I’ve tried a no-prove method and the results are disappointing and likely to crack teeth.
I have tried both a double and single prove but rested on a single prove – so no need to prove the dough in the bowl. Simply shape the dough into the buns and prove in the tin/crumpet ring for 40mins before baking.
TOP TIP: Use crumpet rings to support the buns as these look the most authentic once baked. If you don’t have crumpet rings you could use a large muffin tin like I did in my most recent photo shoot but it’s not quite the same shape.
Prove before and after – Doves Freee flour blend


Prove before and after – Caputo flour blend


Why are they called Belgium Buns?
I hold my hands up here. I NEVER succumb to the easy grab and go ‘facts’ of Wikipedia and my research always runs far deeper. This one has me stumped. I have found testimonials from locals saying the bun is nowhere to be found in Belgium. But, I have not found any evidence to suggest where they did originate.
If you have any knowledge on this I would love to hear it so please do comment below to let me know what you know!

What’s the difference between Belgium Buns and Chelsea Buns?
What’s the difference? Not much to be fair! A Chelsea Bun is generally the same type of dough with raisins or currants and rolled in the same way too. You don’t add a lemon curd but often sprinkle the dough with sugar before rolling.
When it comes to decorating the differences are that Belgium Buns are iced and topped with a cherry and Chelsea Buns are glazed with syrup and sprinkled with confectionary rock sugar. That said the Bath Bun also has a crunchy sugar topping – oh what a tangled web of buns!
How to make the dough
I make up the three main components separately;
The dry mix consisting of flour, sugar, quick acting yeast and salt.
The wet mix consisting of dairy free milk, butter and condensed milk.
The ‘egg’ binder consisting of psyllium husk, ground flaxseed and water.
Once you have all three components ready it’s time to add them all together and mix, ideally using a mixer and a dough hook.


How to make the Belgium Bun shape
Once you have made your dough, gently roll out on a well floured work surface. As you can see in the images I roll the dough out to approx. 35x25cm. Then simply spread with your lemon curd or cream cheese alternative and sprinkle with raisins. Then using a pizza cutter cut out 6 strips so you can roll each bun individually.
TOP TIP: cutting the strips individually makes for a much better end resulting shape and prove.


My dough is way too soft!
Do not panic after you have made your dough. I know it looks way too soft and you think there is no way you’ll be able to work with it but have faith. Gluten free flour expands when introduced to liquids. This means after the first prove your dough will, granted, be very soft, but you will be able to work with it.
Will these Belgium Buns keep well?
No. I cannot lie, these will be delicious on the day of baking but the next day they will be tough as old boots. If eating them the next day I normally heat them in the microwave for 10 seconds, this is enough time to soften the bun but not so long that the icing melts and drips everywhere.

Other gluten free favourites you may like to try


Gluten Free Belgium Buns Recipe
If you make it and like the recipe I would be eternally grateful if you popped back and commented leaving a star rating as this will tell search engines that this recipe is worth checking out and others will get to find it in searches.

Gluten Free Belgium Buns
Equipment
- jumbo muffin tin alternative to crumpet rings
Ingredients
Dry ingredients
- 500 g gluten free plain flour I recommend Caputo
- 60 g caster sugar
- 14 g dried active yeast 14g = 2 sachets
- 1 tsp salt
'Egg' binder ingredients
- 1 tbsp psyllium husk powder
- 1 tbsp ground flaxseed
- 100 ml cold water
Wet ingredients
- 50 g dairy free butter I use Flora Plant Blocks
- 200 ml dairy free milk
- 100 g vegan condensed milk
For the filling
- 150 g raisins
- 120 g vegan lemon curd see notes for cream cheese alternative
For the icing topping & decoration
- 400 g icing/confectioners sugar
- 4 tbsp water
- 6 glace cherries
Instructions
To make the bun dough
- In a large bowl (ideally a stand mixer) add the gluten free flour, easy action yeast, sugar and salt. Using a whisk stir the dry ingredients to combine.
- In a jug measure out the free from butter, milk and condensed milk and heat in the microwave for 30-60 seconds to melt the butter. You could do this bit on the hob if you like.
- In another jug add the psyllium husk powder, ground flaxseed and cold water and beat quickly with a fork or mini whisk. You will get a gooey gloop so don't worry, you've not gone wrong!
- Ideally using a stand mixer with a dough hook, add the wet ingredients and the 'egg' binder and begin to combine slowly. You will need to use a spatula to scrape the sides of the bowl to get an even mix.
- DO NOT PANIC – IT'S SUPPOSED TO BE WET LOOKING. Gluten free flour swells on contact with liquid so once you have thoroughly combined the ingredients, scraped from the sides and floured your surface in anticipation the dough will have thickened.
Fill and prove the buns
- Turn the soft dough out onto the floured surface and gently knead for a couple of minutes but don't over work.
- Roll into a long rectangle approx. 35x25cm and 1-2cm thick.
- Spread the lemon curd over the dough [see notes for lemon cream cheese alternative].TOP TIP: warm the curd in the microwave for 10 secs to make it more spreadable.
- Next sprinkle the raisins evenly over the dough.
- Now using a pizza cutter cut out 6 equal(ish) sized strips and roll each bun individually. This is my favourite bit!
- Place each dough spiral into a crumpet ring on a greased baking tray and cover with a damp tea towel in a warm place to prove for 45 minutes.ALTERNATIVE: places each roll into a jumbo-sized muffin tin, both methods work, the crumpet rings are a more authentic shape.
- Preheat the oven to 180°C | 160°C fan | 350°F | Gas 4.
- Once the buns have proven, pop into the preheated oven for 20-25 minutes. You want them to have a little give in them when pressed with your finger.TOP TIP: add a pan of boiling water to the bottom of the oven (especially if you have a fan oven) as the moisture created will aid with the final rise and keep your buns moist.
- Remove from oven and cool completely before decorating
Decorate the Belgium Buns
- Make the thick icing by combining the icing sugar and water (it needs to be thick else it will run everywhere)
- Have patience and add dollops of the icing and using a teaspoon tease the icing to the edge of each bun.
- Finally top with a glace cherry half and enjoy!
Notes
Nutrition
Click to find out more about the Free From Food Awards
I love to see your photos of my bakes, dinners and treats. Head to your favourite social media account and don’t forget to tag me in @glutarama so I can see them too!
Click to see gluten free products available on Amazon
Subscribe to my email list so that you get NEW recipes straight in your mailbox every Friday plus 3x FREEBIE’s and access to some amazing gluten free DISCOUNTS

*disclaimer: I use affiliate codes on my website, the vast majority are to Amazon. If you click on any of the links or images in the post and make a purchase my family will benefit from a small % of that purchase at no extra cost to you.
For full transparency, in 2020 I made my first £25, and in 2022 I reached my next £25 (Amazon don’t transfer the money until you reach £25). Recently I got paid a whopping £27.10 for 2023.
So to date I have made £78.58 since I first started the scheme in 2017. It won’t pay the bills, that’s for sure but it does help to pay for ingredients or little treats to cheer me up!




Rebecca, I am so happy you visited my blog, otherwise I wouldn’t have found out about your treasure of a blog! I love everything I see here and will take my time discovering (and hopefully trying out) many new recipes!
What a lovely comment to leave Maya, I’m thrilled to have you here and likewise, to have found your lovely corner of the internet too. xx